leading providers of industrial video inspection cameras and solutions.Our products mainly include the following series:handheld telescopic pole video inspection camera, portable pipe inspection camera, heavy-duty sewer cameras,HD drain cameras ,360 degree pan tilt rotation pipe camera, Dual view lens pipeline inspection camera,water well cameras,under water camera ,borehole cameras,chimney inspection cameras and other industry video inspection cameras.
leading providers of industrial video inspection cameras and solutions.Our products mainly include the following series:handheld telescopic pole video inspection camera, portable pipe inspection camera, heavy-duty sewer cameras,HD drain cameras ,360 degree pan tilt rotation pipe camera, Dual view lens pipeline inspection camera,water well cameras,under water camera ,borehole cameras,chimney inspection cameras and other industry video inspection cameras.
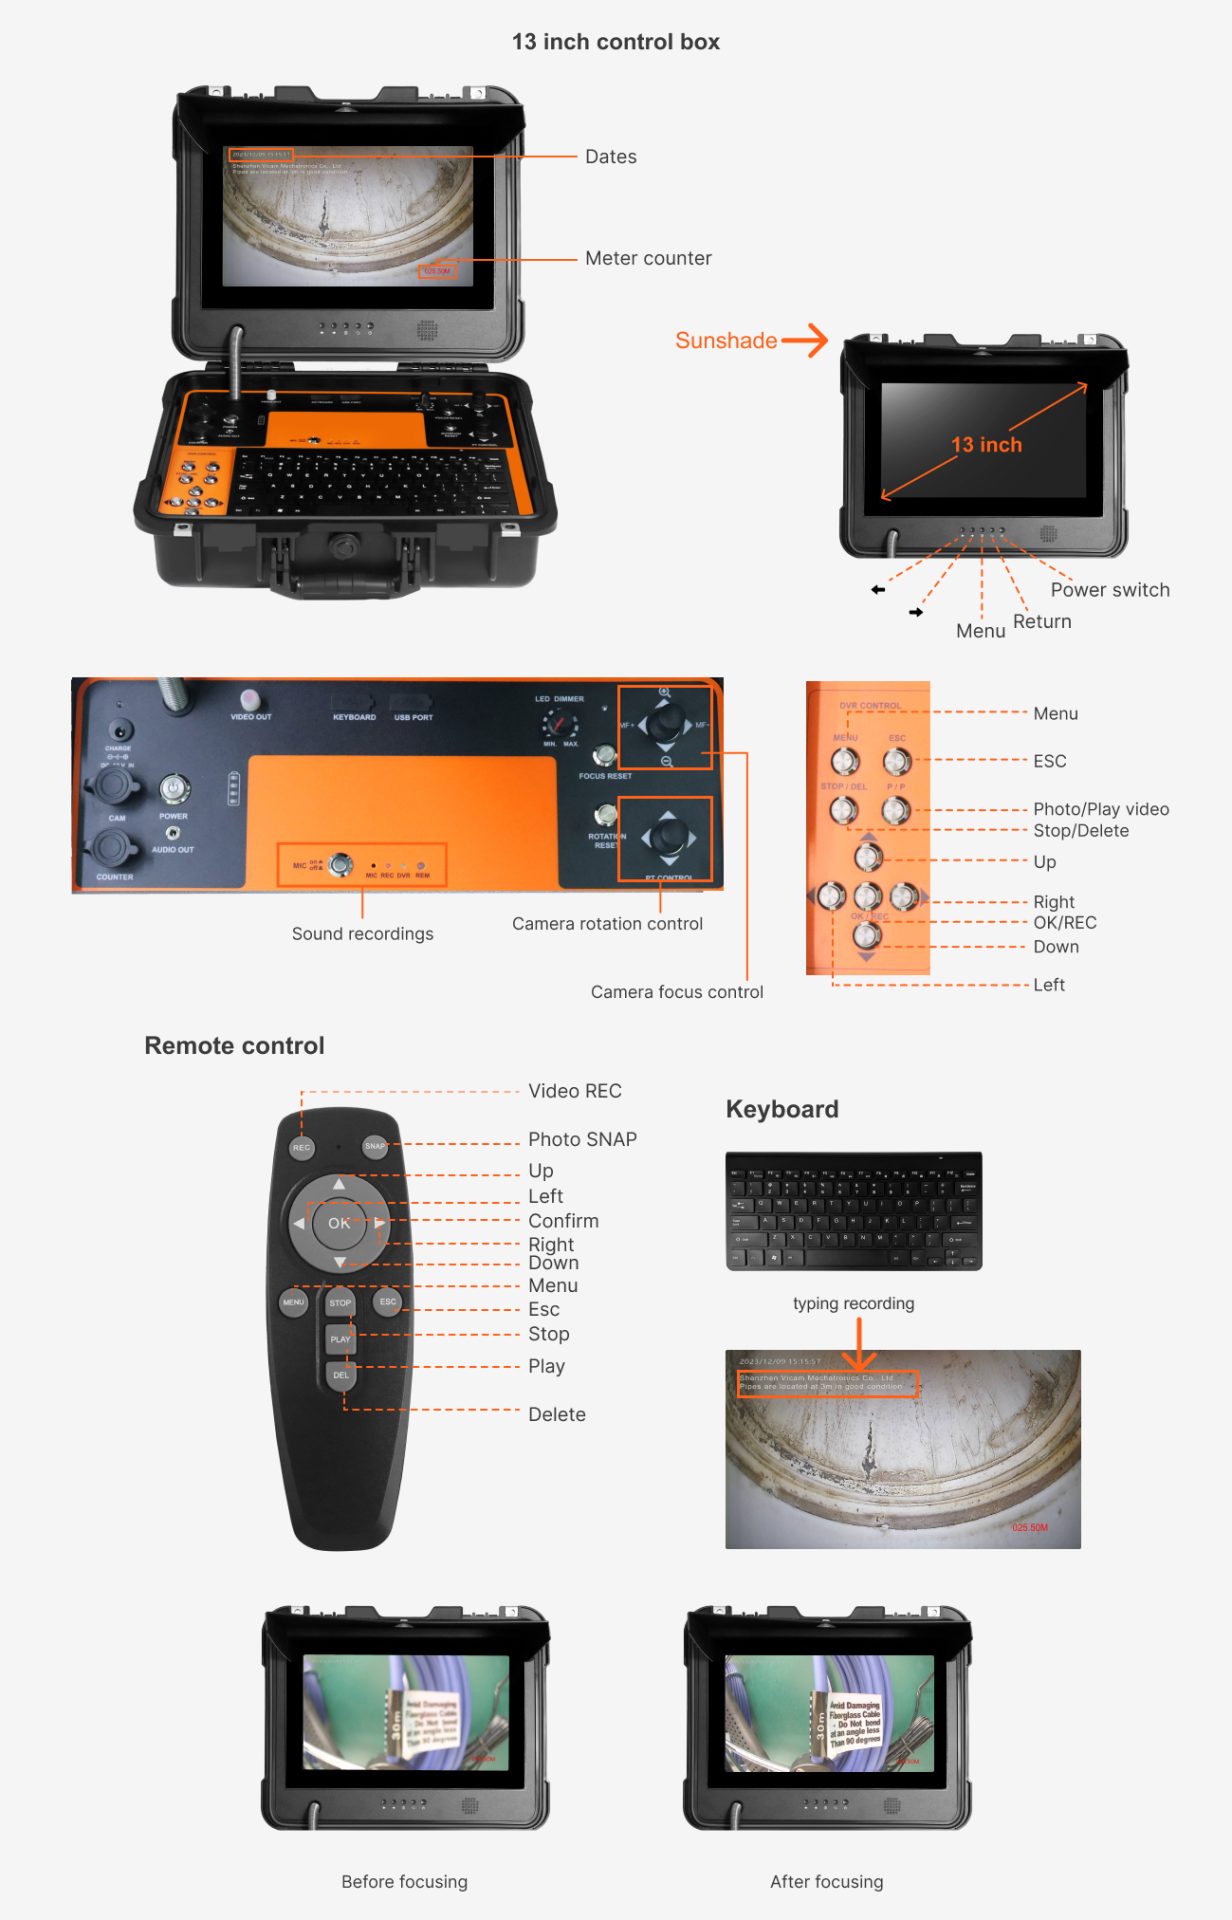
Home > Resource > FAQ > Check the differences between 33mm and 50mm
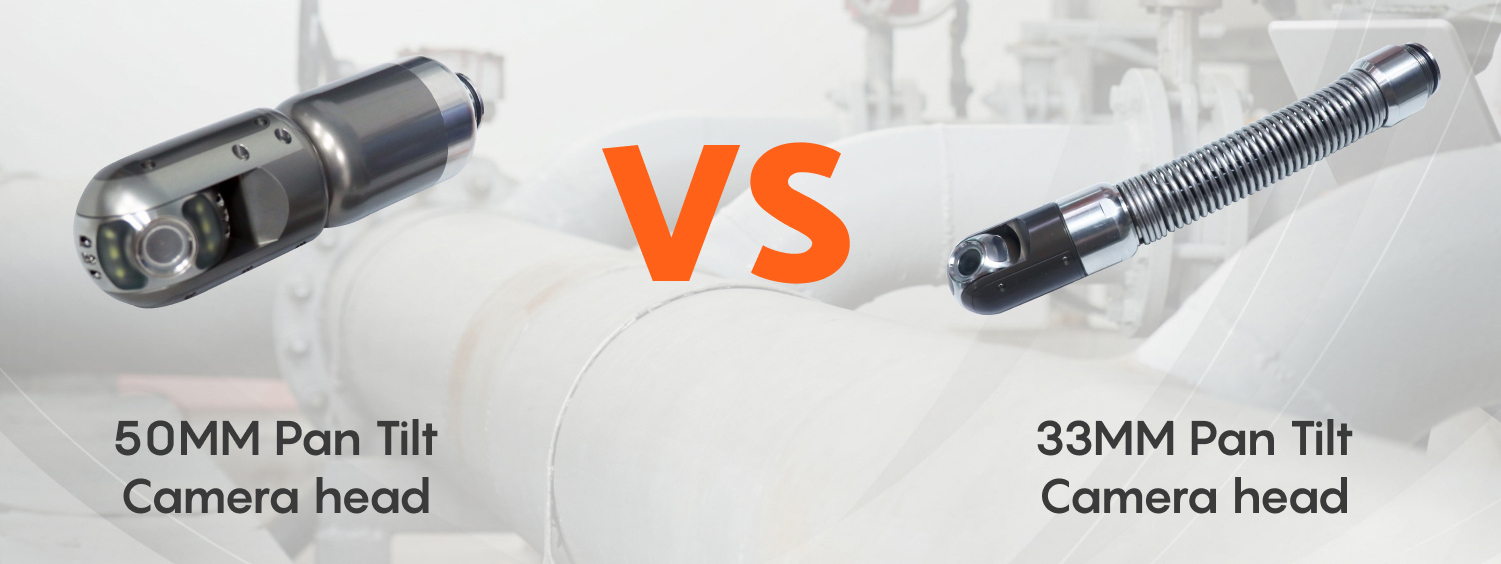
Check the differences between 33mm and 50mm pan tilt sewer camera head
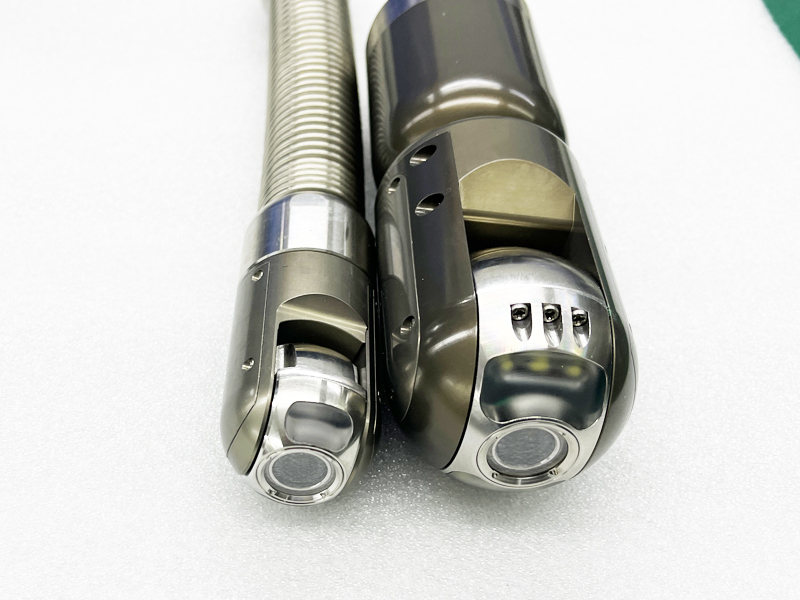
33mm Pan Tilt Sewer Camera Head
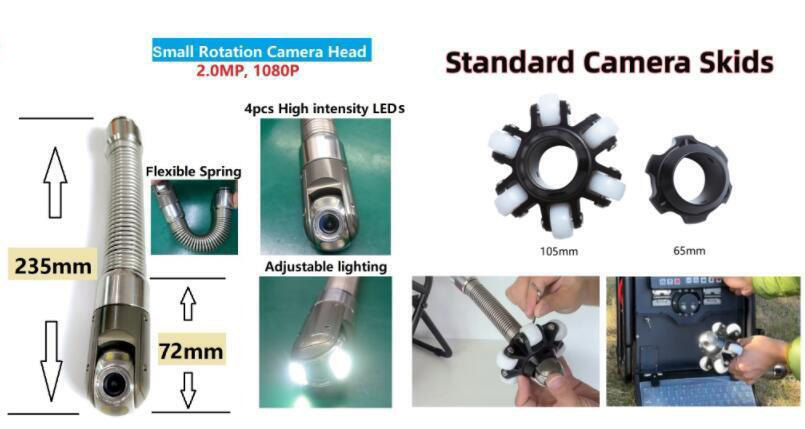
Camera size is very smart. Daimeter is only 33mm and the front part length is 72mm. It is easy to pass 90 degree bend in 3inch pipe .
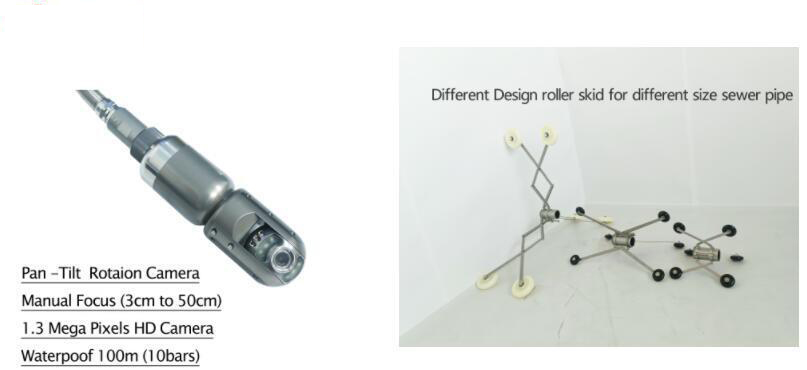
Pan 360 degree rotation,Tilt 180 degree rotation and manual focus, it can provide an immersive and precise viewing experience. It enables users to fine-tune the sharpness and clarity of the image.
The camera is waterproof IP68 design.It can be fully submerged in water.
The camera is Full High Definition with a resolution of 1920 x 1080 pixels. This high-quality camera ensures that your videos and photos are clear, crisp, and vibrant.
The smart design camera also builts in 512hz sonde feature for locating underground pipes and utilities.
It is special designed for 3inch to 8inch pipeline inspection .
50mm Pan Tilt Sewer Camera Head
Camera is only 50mm and the length is 154mm.
Pan 360 degree rotation,Tilt 180 degree rotation and manual focus, it can provide an immersive and precise viewing experience. It enables users to fine-tune the sharpness and clarity of the image.
The camera is waterproof IP68 design. Waterproof pressure 10bars,making it highly resistant to water damage.
The camera is High Definition with a resolution of 1280x 720 pixels. This high-quality camera ensures that your videos and photos are clear, crisp, and vibrant.
The camera also builts in 512hz sonde feature for locating underground pipes and utilities.
It is special designed for 4inch to 20inch pipeline inspection or water well inspection, borehole inspection.
Home > Resource > FAQ > How to install the roller skid for 50mm
How to install the roller skid for
50mm pan tilt sewer camera head
How to Install Optional Wheeled skid for 50mm pan tilt pipe camera head? Do it as the video. To begin the installation process, gather all the necessary tools and components. Make sure you have the Optional Wheeled skid designed specifically for the 50mm pan tilt pipe camera head.
If our sewer pipe cameras and borehole cameras have piqued your interest, we encourage you to reach out to our dedicated sales team. They possess extensive knowledge and expertise in our product range and can provide you with detailed information, answer any queries, and assist you in choosing the most suitable camera for your specific requirements.
We are committed to delivering cutting-edge inspection solutions that empower professionals across various industries to efficiently and accurately assess the condition of pipelines and wells. Contact us today and discover how our advanced cameras can revolutionize your inspection processes.
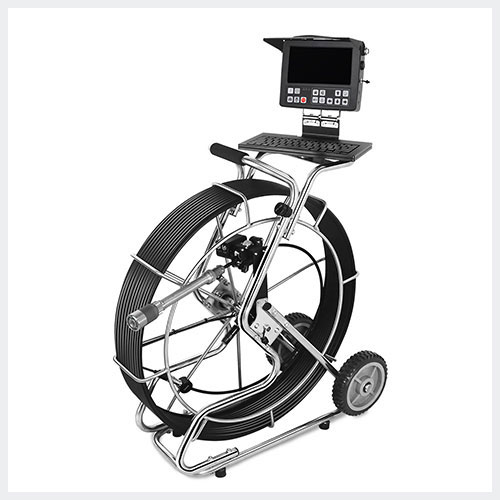
Home > Resource > News > How to install the HD pan tilt pipe camera V13
How to install the HD pan tilt pipe camera V13
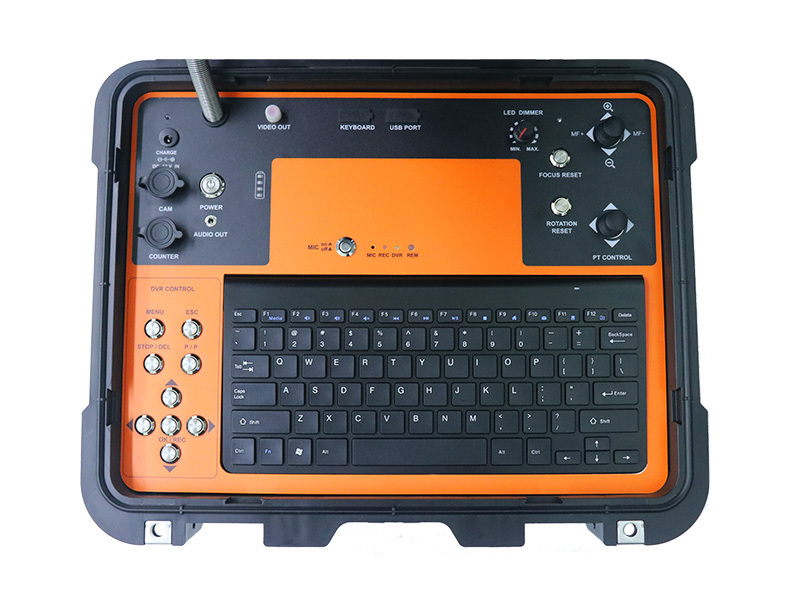
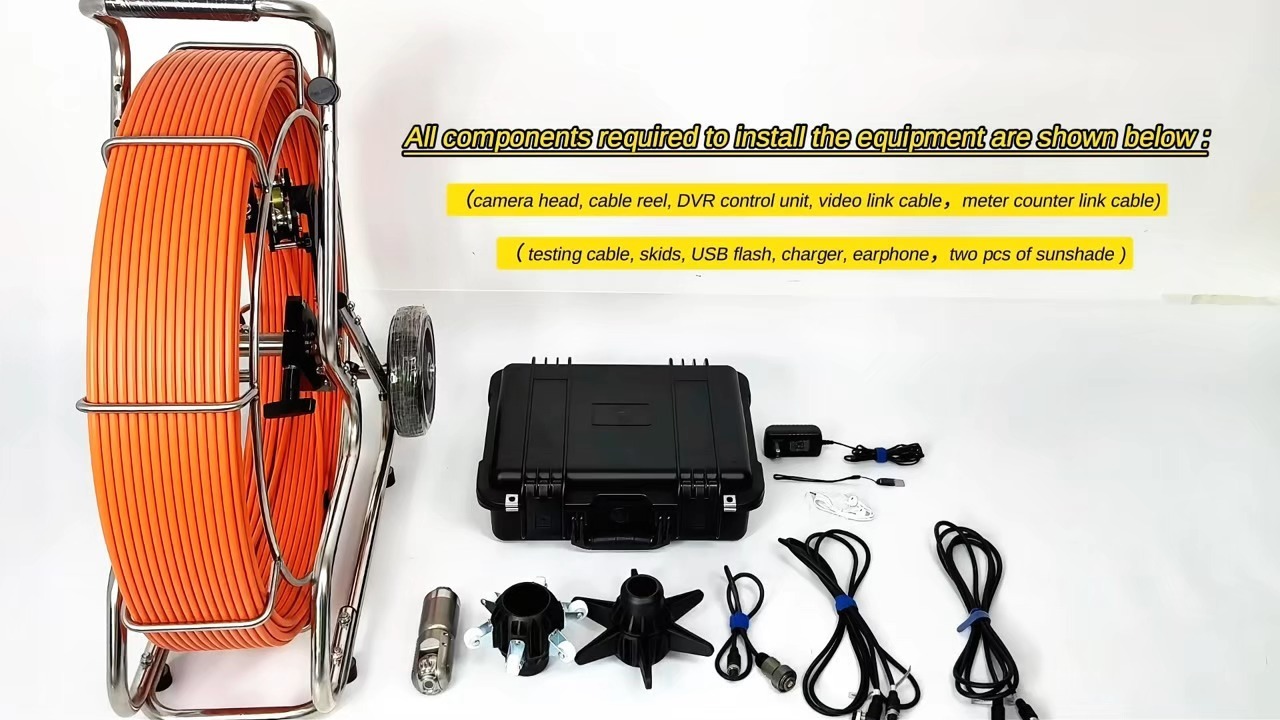
Welcome to the installation video for the V13 Pan Tilt Pipe Camera. This video will guide you through the setup process, ensuring you can efficiently and effectively use your new inspection tool.
Video Outline:
Unboxing:
Begin by carefully unpacking the V13 and its components. Ensure you have the camera, control unit, display, and any accessories included in the package.
Install the fiberglass cable to meter counter
Unscrew the hand screw of the counter, loosen the cable catch wheel and fix the cable on the wheel groove before tightening the screw
Connecting the Camera and skid
Connect link cables:
1pc meter counter link cable, 1pc signal link cable, two cables are labeled with different signs. Straight connection to the control box, elbow connection to the cable reel.
Wireless Keyboard:
Take out the USB adaptor from the back of the keyboard, insert it into the “Keyboard” port of the control box, load 2 pcs #7 batteries.
If you can’t typewrite the words,please press F8, the cursor is displayed.
F8: Display the words F9: Hiden the words F10: Clear all words
Press the “Power On” button to turn on the system
Testing the System:
Before beginning inspections, power on the system and test the camera’s pan and tilt functions using the control interface. Verify that the image is clear on the display.
Recording the video
Insert the factory-configured USB flash drive into the “USB” port.
Ready for Use:
Once everything is set up and tested, your V13 is ready for use. Review safety precautions and best practices for inspecting pipes.
Thank you for watching the installation video for the V13 Pan Tilt Pipe Camera. If you have any questions or require further assistance, please refer to the user manual or contact our support team.
33mm Pan Tilt Sewer Camera : More than 200pcs orders in the past 3 months
The 33mm pan tilt sewer camera is designed to provide exceptional clarity and maneuverability in sewer inspections.
33mm Pan Tilt Sewer Camera: A Market Success Story
We are thrilled to announce that the Vicam 33mm high-definition rotating pipe camera has achieved remarkable success in the market, selling over 200 units in just its first three months. This achievement highlights the camera’s superior performance, reliability, and the trust our customers have in our products.
Unmatched Performance and Versatility
Its high-definition camera ensures that users can capture detailed images and videos, making it easier to identify and address issues within pipes. The 33mm size is perfect for navigating through various pipe sizes, offering versatility for different inspection needs.
Key Features:
High-Definition Clarity: Capture every detail with crystal-clear images and videos.
Rotating Camera Head: The 360-degree rotation capability allows comprehensive inspection coverage.
Durability: Built to withstand harsh environments, ensuring long-lasting performance.
User-Friendly Interface: Easy to operate, reducing the learning curve for new users.
Customer Satisfaction
The positive feedback from our customers underscores the value and effectiveness of the Vicam 33mm sewer camera. Users have praised its ease of use, durability, and the high-quality images it produces. These attributes have contributed to its strong sales and growing popularity in the market.
Join the Growing Number of Satisfied Customers
If you haven’t experienced the benefits of the Vicam 33mm pan tilt sewer camera yet, now is the perfect time to see what the excitement is about. Our camera is designed to meet the rigorous demands of sewer inspections, providing you with the tools you need to perform your job efficiently and effectively.
Thank you to all our customers for making the Vicam 33mm high-definition rotating pipe camera a success. We are committed to continuing to provide innovative and reliable solutions to meet your inspection needs.
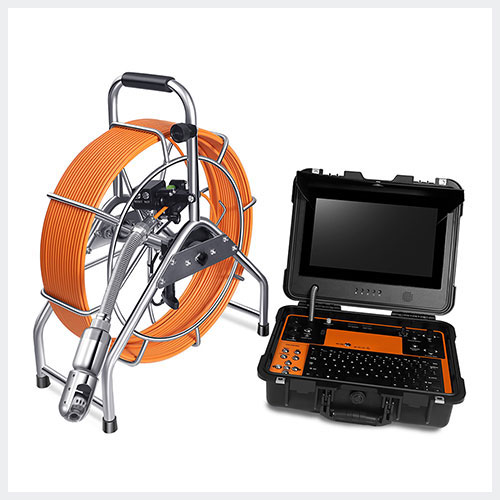
Home > Resource > News > How to install HD Deep Well Borehole Camera V13-BCS?
How to install HD Deep Well Borehole Camera V13-U45MR2?
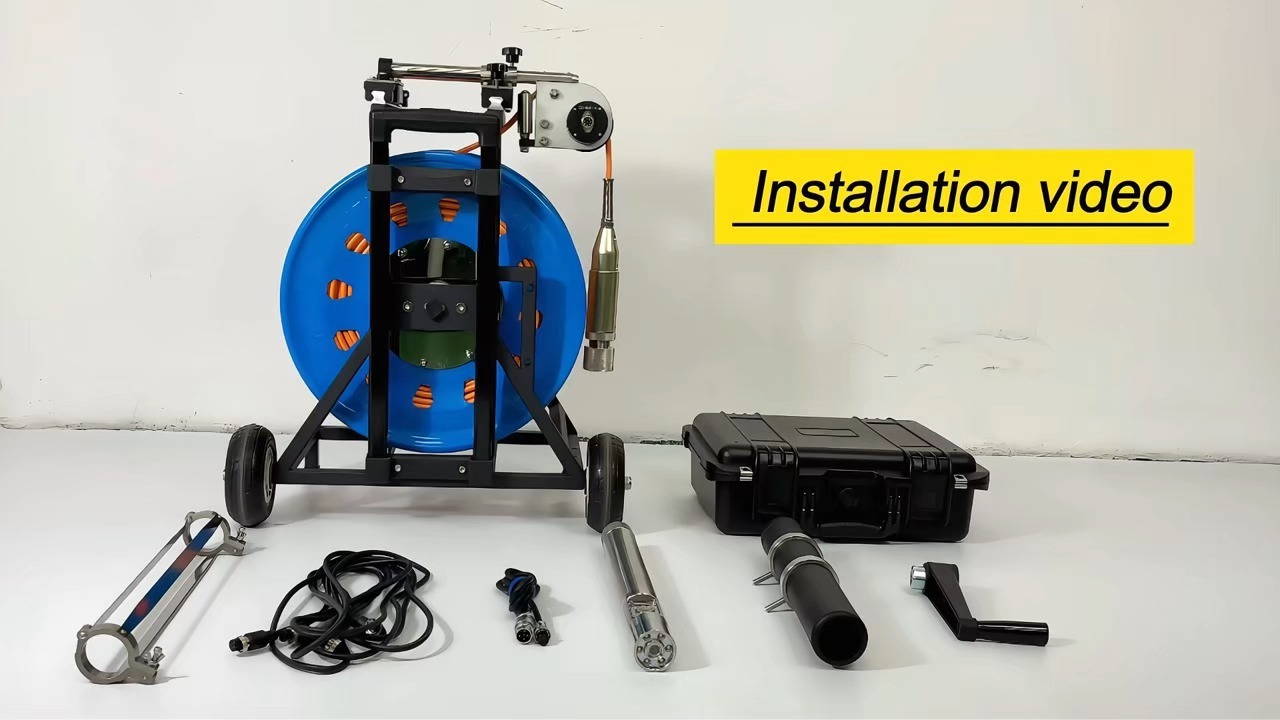
Welcome to the installation video for the V13-U45MR2 200m HD Borehole Camera with manual reel.This video will guide you through the setup process, ensuring you can efficiently and effectively use your new inspection tool.
Unboxing:
Begin by carefully unpacking the V13-U45MR2 and its components. Ensure you have the camera, control unit, display, and any accessories included in the package.
Install the camera storage box to the cable reel
Install manual reel handle
Install cable to cable reel and connect 45mm dual view camera head
Connect link cables:
1pc meter counter link cable, 1pc signal link cable, two cables are labeled with different signs. Straight connection to the control box, elbow connection to the cable reel.
Wireless Keyboard:
Take out the USB adaptor from the back of the keyboard, insert it into the “Keyboard” port of the control box, load 2 pcs #7 batteries.
If you can’t typewrite the words,please press F8, the cursor is displayed.
F8: Display the words F9: Hiden the words F10: Clear all words
Press the “Power On” button to turn on the system
Testing the System:
Before beginning inspections, power on the system and test the camera’s pan and tilt functions using the control interface. Verify that the image is clear on the display.
Recording the video
Insert the factory-configured USB flash drive into the “USB” port.
Ready for Use:
Once everything is set up and tested, your V13-U45MR2 is ready for use. Review safety precautions and best practices for inspecting deep wells.
Thank you for watching the installation video for the V13-U45MR2 HD Borehole Camera. If you have any questions or require further assistance, please refer to the user manual or contact our support team.
Home > Resource > News > New Arrival Mini HD Pipe Camera V8-P20A6
New Arrival Mini HD Pipe Camera V8-P20A6
Cutting-edge technology with a compact design. Weighing just a few kilograms, it’s easy to carry and perfect for professionals on the move. Whether you’re inspecting residential pipes, commercial drainage systems, or industrial sewer lines, the V8-20M delivers exceptional performance in a portable package.
Introducing the V8-P20A6 Mini HD Pipe Camera: Precision Meets Portability
Is excited to present its latest product: the V8-P20A6 Mini HD Pipe Camera. Designed to provide unmatched clarity, portability, and efficiency, the V8-P20A6 is a breakthrough tool for professionals who need high-quality inspections in small-diameter pipes.
High-Definition 20mm Camera Head
At the heart of the V8-P20A6 is its HD 20mm waterproof camera head, built to inspect pipes with diameters ranging from 30mm to 70mm. The camera offers crisp, detailed imaging, allowing technicians to spot even the smallest cracks, blockages, or defects with precision. Its waterproof design ensures durability and functionality in wet and harsh environments, making it suitable for both indoor and outdoor inspections.
Crystal-Clear 8-Inch HD Display
For real-time inspections, the V8-P20A6 features a large 8-inch HD display. This ensures that operators have a clear and sharp view of the pipe’s interior, enabling quick and accurate analysis. The high-definition screen enhances the inspection process, allowing users to make immediate decisions based on clear visuals.
Flexible 20-Meter Fiberglass Cable
The V8-P20A6 is equipped with a 20-meter flexible fiberglass cable, designed to navigate the twists and turns of pipe systems with ease. The cable’s flexibility ensures that even tight corners and hard-to-reach areas can be thoroughly inspected, while its durability guarantees consistent performance over time.
Designed for Versatile Applications
The V8-P20A6 Mini HD Pipe Camera is an ideal solution for a wide range of industries. Its small size and robust capabilities make it perfect for plumbers, contractors, and maintenance professionals conducting inspections in residential, commercial, and industrial settings. The camera is especially suited for tight spaces and small-diameter pipes, delivering a versatile tool for any inspection challenge.
Key Features of the V8-P20A6 Mini HD Pipe Camera:
20mm waterproof HD camera head for inspecting pipes from 30mm to 70mm in diameter.
8-inch high-definition display for clear on-site viewing.
20-meter flexible fiberglass cable for navigating complex pipe structures.
Lightweight, compact, and highly portable.
Suitable for a wide range of applications, including sewer inspections, drain cleaning, and pipe maintenance.